
![]()
|
|
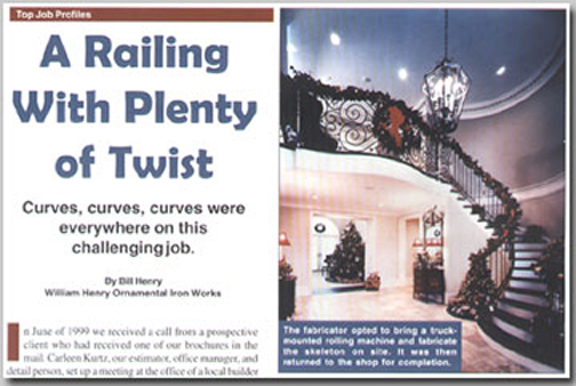
In June of 1999 we received a call from a prospective client who had received one of our brochures in the mail. Carleen Kurtz, our estimator, office manager and detail person, set up a meeting at the office of a local builder of prestigious homes, Trueblood Construction. She met with their project manager, Brent Schuler, to do a take off and review the scope of the work. Carleen returned to our office with drawings and a picture of a railing design the owner had chosen from a magazine for an interior curved staircase with a curved balcony and also one straight balcony, I was very excited not only at the prospect of working with a new client on a challenging project, but also at the chance to use our CP-30 roller, recently purchased for a curved stainless steel pipe rail and we feared would see only occasional use. The next step was to meet with the Builder/Contractor at the job site to verify the field measurements and discuss the details of the job. We supplied them with a wide variety of choices from several suppliers for the bronze collars, posts, hand rail moulding, lateral turns, forged leaves etc. along with making a few suggestions for them to take back to the owner. Once all the design details were worked out, Carleen, our foreman Brian Smith, and myself sat down to discuss how we would take on this project and came up with some labor, material and tooling costs. After the proposal was presented, accepted, contracts signed and payment schedule arranged, it was time to get down to work. It was decided that in lieu of submitting shop drawings we would provide full size samples of the scrolls, forging and railing sections for approval (which made a nice addition to our show room later). We also sketched the scrolled balcony section on full size sheets of cardboard. The actual balcony rail design had to be modified due to the fact that the original design did not take into account the 4" opening rule and was only about 7'-0" wide and our balcony was 14'-0". We used the original design for the center area of the balcony and after several hours of sketching, came up with the side sections that we felt flowed well. We had to tighten up and modify the scroll patterns and added extra leaves in the remaining areas that were still too large. A construction schedule was submitted to help coordinate with the other trades involved. After another meeting at our shop and a few minor changes, all the submittals were approved. For the fabrication of the stair and balcony rails, we came up with what we thought was a unique and original idea, mount our new roller in a cradle on the rear of our installation truck (unique until I read your article in the November/December 2000 issue which I really enjoyed and had to run right out to the shop to show the guys. I guess there really is nothing new under the sun). The stair skeleton, constructed of 1 ¼" x 3/8" flat bar for the bottom rails and 1 ¼" x ½" channel for the top sub-rails was formed on site and then brought back to our shop for completion. This method proved to work very well and only took three men one day eliminating the need for running back and forth for templating and fittings. Back at the shop, after cutting a small hole in our 11'-0" high ceiling to accommodate our 13'-0" high skeleton, we were busy pinning the bronze collars to the 5/8" round balusters and forming the ¼" x ¾" bottom scroll border in our ram bender. After welding all the balusters and border scrolls in the stair rail, we replaced the temporary steel posts used for the skeleton with the decorative bronze posts and ground, sanded and dyna-filed all the welded joints. For the curved bronze 1 15/16" wide top moulding, we called our friends at Promoco who set us up with synthetic Delrin dies for our roller. This enabled us to form the moulding cold without any marring. I was more than a little concerned that the clearance between the 1 ¼" sub rail and the inside of the moulding was only 1/32" on either side. But after rolling the bronze and twisting into shape with some aluminum forks we had made, all that was needed for a perfect fit was a little heat and clamping in one small area at the bottom of the rail near the lateral turn. The moulding for the balcony section went equally well so we put the extra two lengths we had bought in stock. All the brass joints were silver soldered in our shop with the exception of were the stair meets the balcony. In this area we left the moulding long and formed the second bend of the gooseneck and silver soldered the joint on site. The bronze lateral and sub channel were bolted together and bent hot using a piece of pine as a temperature stick. For the curved balcony section, which is constructed of the 5/8" round, scrolls were formed hot around jigs made in our shop with a combination of hand forged ends and purchased forged leaves, we decided to build the entire section flat on a lay out table. We used the bottom flat bar rolled on site as a template and with the help of Brent Reeb, a long time friend, fellow fabricator and black smith, we formed the radius in a press brake. After a half hour, two passes through the press brake and a little luck, the railing and the template were a perfect match. The installation was done on a Saturday morning when we could have the site to ourselves. It took five men to carry the heavy sections up the staircase and about three hours to screw the sections down, silver solder the final joint and touch up the paint and brass. Total fabrication and installation time was approximately 160 hours not including the submittals, samples, tooling, fixtures, etc.. About a week after completion, we received two calls. One was from Trueblood Construction informing us that there was an additional 98'-0" of curved exterior railings at the rear patio that they wanted us to do. The other call was from a new client who had heard about our railing from some of the other trades at the site and wanted us to do a similar curved brass interior stair and balcony for them. Now I'm really starting to wonder if I will ever see a straight railing job again! Our company was started in 1994 with the help and support of my Father, Bill Henry, who had recently retired from Louis Henry Iron Works, a business he ran with my Uncle Lou and cousin George. Their shop was originally started by my Grandfather, Louis Henry, in the great depression. He started it in a chicken coop that he later converted into a shop and had a wagon which he replaced with a model T truck. In the day of automated machines, faxes, e-mails and auto-cad I think back to being a small boy in my Father's shop listening to stories of twisting 1" square bars by hand with a sleeve in the floor and long handled wrenches and how they installed railings by using a hand held star chisel, hammer, a cup of hot lead or sulfur and only charging $19.00 for it. It makes me wonder what the world will be like and what kind of stories my children Bill and Nicole, who both work here part time while attending high school and college, will have to tell their future children. Happy Fathers Day Dad, and thanks for everything! |
© 2016 William Henry Ornamental Iron Works